Overview
This document provides steps for:
- Installing a Terra or Terra Prime movie server.
- Adding a Terra to a Strato system.
- Creating a Strato system from a Terra server.
NOTE: This document contains installation instructions for Terra and Terra Prime movie servers (including Compact models). For installation instructions specific to Mini Terra Prime, refer to the Mini Terra Prime Installation Guide.
Kaleidescape Terra
The Kaleidescape Terra movie server was designed to store movies without added compression or loss of quality. You can add Terra to any Strato system to store movies downloaded from the Kaleidescape store and make them available to every Strato and Alto player in the system. Terra makes it possible to configure a Strato system with many players.
A Terra server will not connect to or add storage to a Premiere system.
You can purchase a full size, 2RU, Terra with four replaceable hard drives or a half width, 1RU, Terra (compact) with a single internal hard drive.
Terra (full size) servers continue operating even after a hard drive fails. The movies that were stored on the failed drive are automatically restored from the Kaleidescape movie store. The failed hard drive can then be replaced in the field to regain the lost capacity.
Terra (compact) contains a single hard drive that is not field replaceable.
Terra can deliver multiple movies at the same time over a standard residential network to Strato and Alto players anywhere in the home. Once a movie is downloaded and stored on Terra, it can be enjoyed immediately from any of these players.
Features of Terra:
- Storage for up to 1,467 4K Ultra HD movies, 2,383 Blu-ray quality movies, or 13,577 DVD quality movies (88TB model).
- Up to four Terra servers can be grouped to store larger collections.
NOTE:Kaleidescape recommends a maximum of four servers (of all types – Alto with Storage, Strato with Storage, Terra, and Terra Prime) per system to ensure smooth and responsive sytem performance. - Provides computing services that enhance player performance.
- Enables configurations with large numbers of viewing zones.
- Up to 10 simultaneous playbacks of 4K Ultra HD movies.
*Five for Terra (compact). - Up to 15 simultaneous playbacks of Blu-ray quality movies.
*Ten for Terra (compact).
What’s in the Box
The following items are included in the box:
- 1x Terra server
- 1x Accessory box containing:
- 1x AC adapter + IEC adapter-to-wall cable
- 1x Ethernet network cable

Front Panel Buttons
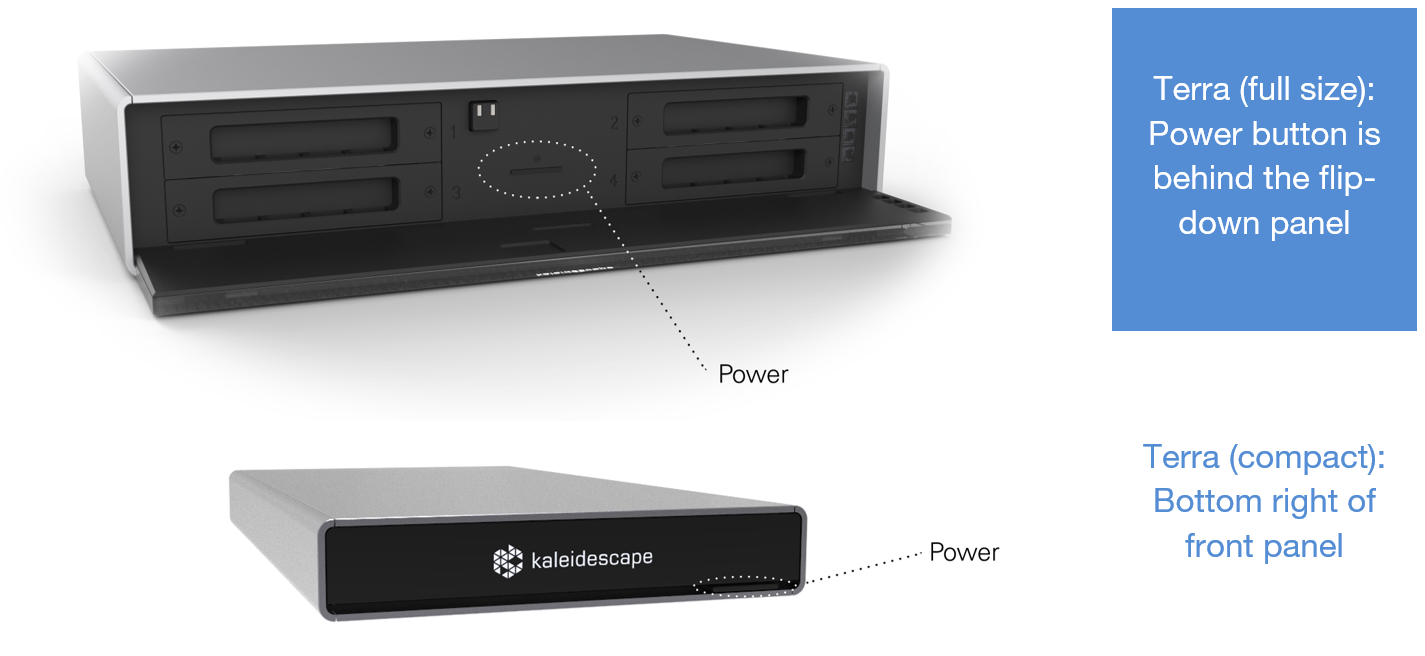
Full size Terra’s power button is behind the acrylic front panel. Push the top middle of the panel to flip it down. The power button of Terra (compact) is located at the bottom right in the recessed vent area.
- Power – toggles Terra on or off (hold for 3 seconds to turn off).
When off, downloads will not proceed and connected players cannot access local movies.
Front Panel Indicators
Full size Terra has four indicators that illuminate in the event of a problem:
- Temperature – operating temperature is too hot or too cold.
- Hard Disk – one of the hard disks inside Terra has a failure.
- Network – a network error has occurred.
- General – check the system’s Browser Interface for details.
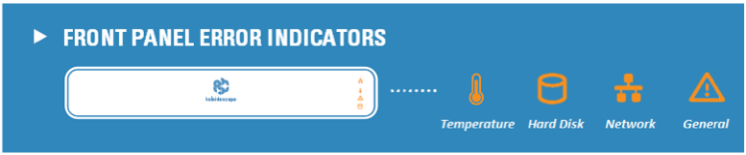
Terra (compact) indicates a general error when the logo is amber. Check the Browser Interface for more information.
Physical Installation
Planning the Installation
Ventilation and Clearance
Use the following guidelines when installing system components to ensure proper clearance and ventilation. These guidelines apply to all installations including rack mounting. (Rack-mount hardware sold separately.)
- Mount components in a location with adequate ventilation.
- Maintain a 2 in. (5 cm) clearance in the back and a 1 in. (2.5 cm) clearance in the front and on the sides.
Power Requirements
Kaleidescape component power supplies are universal input. They operate on any nominal line voltage between 100–240V, and frequency between 50–60Hz.
Kaleidescape recommends a grounded outlet with a high-quality surge protector for the power source for players and servers. A UPS is optional.
Network Requirements
A wired Gigabit Ethernet network connection is required.
Installing Terra
Tabletop / Shelf Installation
- Choose a suitable location that is sturdy enough to hold the Terra.
- Terra (full size) weighs 22 lbs and is approximately 12 inches deep with rear cables connected.
- Terra (compact) weighs 7 lbs and is approximately 16 inches deep with rear cables connected.
- Place the Terra onto the tabletop or shelf. Terra ships with feet attached.
- Installation is complete. You may now proceed to the Network Connection section below.
Rack Installation (Full Size)
- Rack installation of Terra (full size) requires the Terra rack-mount kit (KMOUNT-TERRA), sold separately.
- Terra requires two rack units of space. Determine a suitable location in the rack to install Terra.
- Place the Terra server upside down on a soft, clean surface.
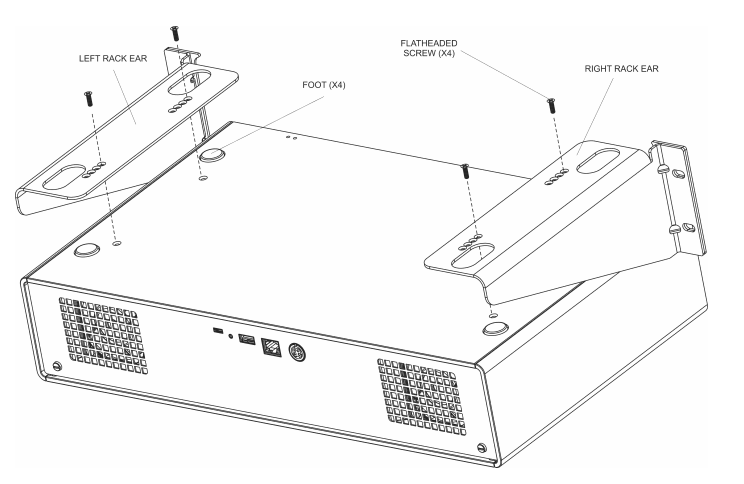
- Assemble the rack ears onto the bottom of Terra as shown:
- Remove and keep the four flat-head screws installed near the feet on the bottom surface of the Terra.
- Place the rack shelf on the unit. Determine how far the front panel should extend beyond the faceplate, aligning the appropriate holes with those just exposed when the screws were removed.
- Reinstall the four flat-head screws through the rack ears and into the aligned screw holes.
Rack Installation (Compact)
- Rack installation requires the Terra (compact) and Strato C universal rack-mount kit (KMOUNT-RACKSHELF), sold separately.
A single, or two side-by-side, Terra (compact) and Strato C components can be rack mounted with this shelf and faceplate package. Both single and double-hole faceplate options are included in the rack kit. - Terra (compact) requires one rack unit of space. Determine a location in the rack to install Terra.
- Select the appropriate faceplate for single or double installation.
- Place the component(s) upside down on a soft, clean surface.
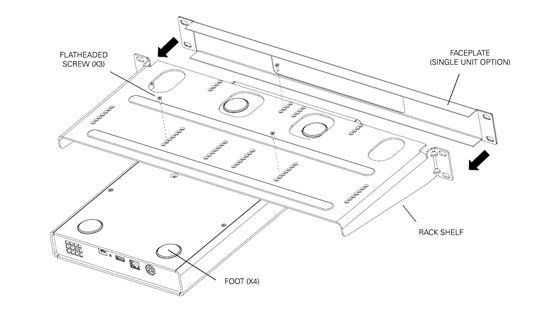
- Assemble the rack shelf and faceplate onto Terra (compact) as shown:
- Remove and keep the three black flat-head screws installed in the front half of Terra’s bottom surface.
- Place the rack shelf on the unit. Determine how far the front panel should extend beyond the faceplate, aligning the appropriate holes with those just exposed when the black screws were removed.
- Reinstall the three flat-head screws through the rack shelf and into the aligned screw holes.
- Slide the front faceplate on.
Network Connection
All Kaleidescape components must be connected to the same local network to be grouped into the same system.
- Ensure that any Kaleidescape Strato and/or Alto players that will be grouped with Terra are connected to a wired network and powered on.
Note: Components must use Ethernet to group with a Terra server. Wi-Fi is not supported when grouping with other components. - Insert an Ethernet cable (Cat5e or better) into the network port on the back of the Terra server.
- Insert the other end of the Ethernet cable into a 1000Base-T (Gigabit) Ethernet switch/router.
- Connect power.
- Turn on the Terra Server using the power button (see Front Panel Buttons). The Kaleidescape logo will illuminate white. Initialization may take several minutes.
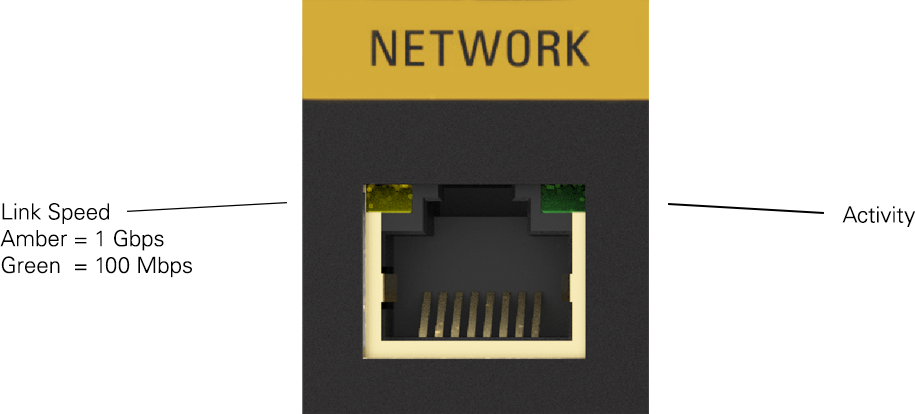
Note: When Terra is turned on, the left network port light will illuminate to indicate a successful network connection. It must be amber, indicating the connection is 1000Base-T. The light on the right blinks when there is network activity.
System Configuration
First-Time Setup
For a system of Terra servers and Strato C players: connect network and power to each component, group them together using the Browser Interface, then connect video to the players. Activate the system using the System Activation via the Browser Interface sequence as detailed below.
For a system with any number of Strato 2U, Strato S, or Alto players: set up the players first, group them together, then complete the Activation step. Then add the Terra(s) to the system. If needed, more details on activation and grouping are found in the player’s installation guide (available here).
Grouping Components
You will use the Browser Interface to group components.
Enter http://my-kaleidescape.local or http://my-kaleidescape into a web browser connected to the same local network as the Kaleidescape components.
OR if you have players with storage
Enter the Browser Interface URL found in the System Summary of a player’s onscreen display. Use a remote control to select Menu ➝ System ➝ Status ➝ System Summary. You will see the URL at the bottom of the system summary screen.
More options for finding the Browser Interface can be found here:
https://www.kaleidescape.com/support/article/Accessing-the-Browser-Interface
From the Browser Interface:
- Select the Settings tab at the top of the page, then select the Components sub-tab.

- At the bottom of the Components page, click Add component.
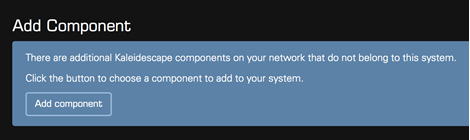
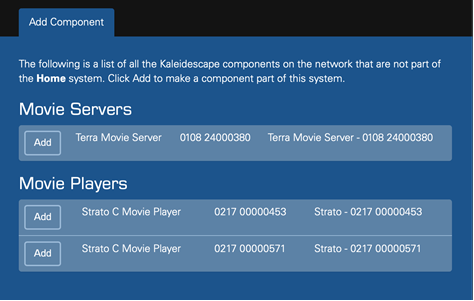
If the Add Component section is not visible, check that all components are powered on and connected to the same wired local network. For best high bit-rate video streaming experiences, components cannot be grouped over Wi-fi due to the unpredictable nature of that connection. - Add to, or create, your Kaleidescape system. The Add Component page lists all Kaleidescape components on the local network that are not already part of a system.
For an existing system, locate the new Terra server and click Add.
For a new system, a single Terra is automatically chosen as the root server for the system, it will not appear in the Add Component’s list. Add players and servers to this Terra as appropriate.
- It may take several minutes for the Terra server, or players, to join the system, especially when a software update must be performed.
- When adding more than one Terra server or player, repeat step 3.
System Activation
To complete the activation process, the system must be connected to the internet.
NOTE: When adding a new component to an already activated Kaleidescape system, the new component does not need to be activated separately. The new component can simply be added to the already activated system.
Systems that are not currently activated will present an Activation screen on the On-screen Display of any player in the system each time the player is restarted or is taken out of standby.

To begin the activation process, simply scan the QR code on the screen using a mobile phone that is connected to the same network as your Kaleidescape system or point your web browser at the link address presented at the bottom of the screen.
This will open a browser window with the Activation request form.

- Enter the email address for the account then click OK.
- Click OK in the second window that appears. The activation process may restart the system.
- Once acknowledgement that the activation request has been successful is displayed, you may close the browser window.
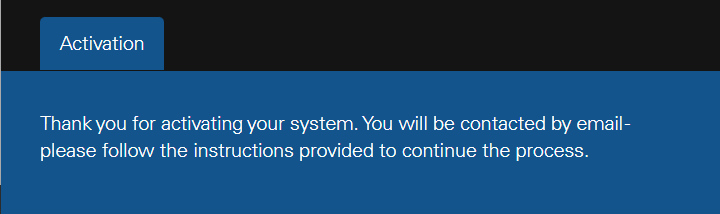
- Check for an email message from support@kaleidescape.com with activation instructions.
- If the message does not appear in a few minutes, check your email client’s Spam or Junk folder.
- Click the link in the email message and follow the instructions to complete the activation process.
NOTE: The link in the email is valid for 7 days. If it expires, simply restart the activation process.
System Activation via the Browser Interface
System activation can also be done using the Browser Interface.
Enter http://my-kaleidescape.local or http://my-kaleidescape into a web browser connected to the same local network as the Kaleidescape components.
OR
Enter the Browser Interface URL found in the System Summary of a player’s onscreen display. Use a remote control to select Menu ➝ System ➝ Status ➝ System Summary. You will see the URL at the bottom of the system summary screen.
More options for finding the Browser Interface can be found here:
https://www.kaleidescape.com/support/article/Accessing-the-Browser-Interface
From the Browser Interface:
- Select the Settings tab at the top of the page then select the General sub-tab.
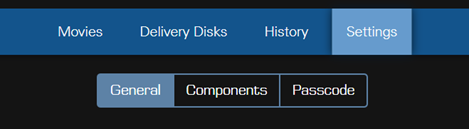
- In the System Activation box, click Activate System.
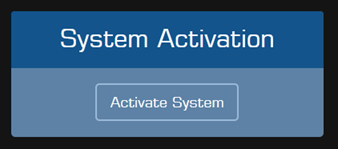
- An Activation popup window will be displayed.
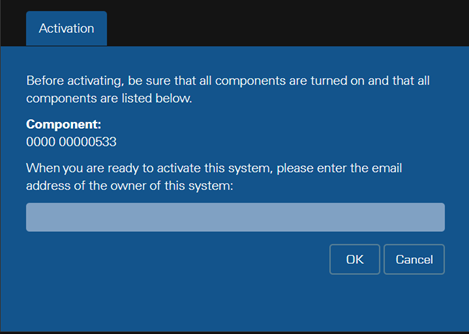
Enter the email address for the system owner or the designated agent and select OK when finished.

Once you have received the notice that the activation request was successful, you may close the popup window. - Check for an email message from support@kaleidescape.com with activation instructions.
- If the message does not appear in a few minutes, check your email client’s Spam or Junk folder.
- Click the link in the email message and follow the instructions to complete the activation process.
NOTE: The link in the email is valid for 7 days. If it expires, simply restart the activation process.
